


The Basics of Support and Resistance
Support and resistance are two critical price points in technical analysis for informed trading and investment decisions. Because time travel is still beyond our reach, anticipating these levels is useful to both new and experienced traders for gauging when to enter and exit trades.
What is Support?
A recurring theme in economics and business is supply and demand. Typically, prices are vulnerable to decline because of weak demand. The lower prices fall, the more alluring they become to those unwearyingly waiting for the right moment to buy the shares. If you are the impatient sort, it might be hard to sit by and wait. At some level, demand that would have been slowly increasing will rise to the level where it matches supply. At this point, prices will stop falling. This is support.
Support—even the word itself sounds reassuring, but traders also benefit from learning to manage their emotions—is a price below which a stock does not tend to fall over a given period of time. In other words, it is the presumed “floor” price of a particular stock—until it is not.
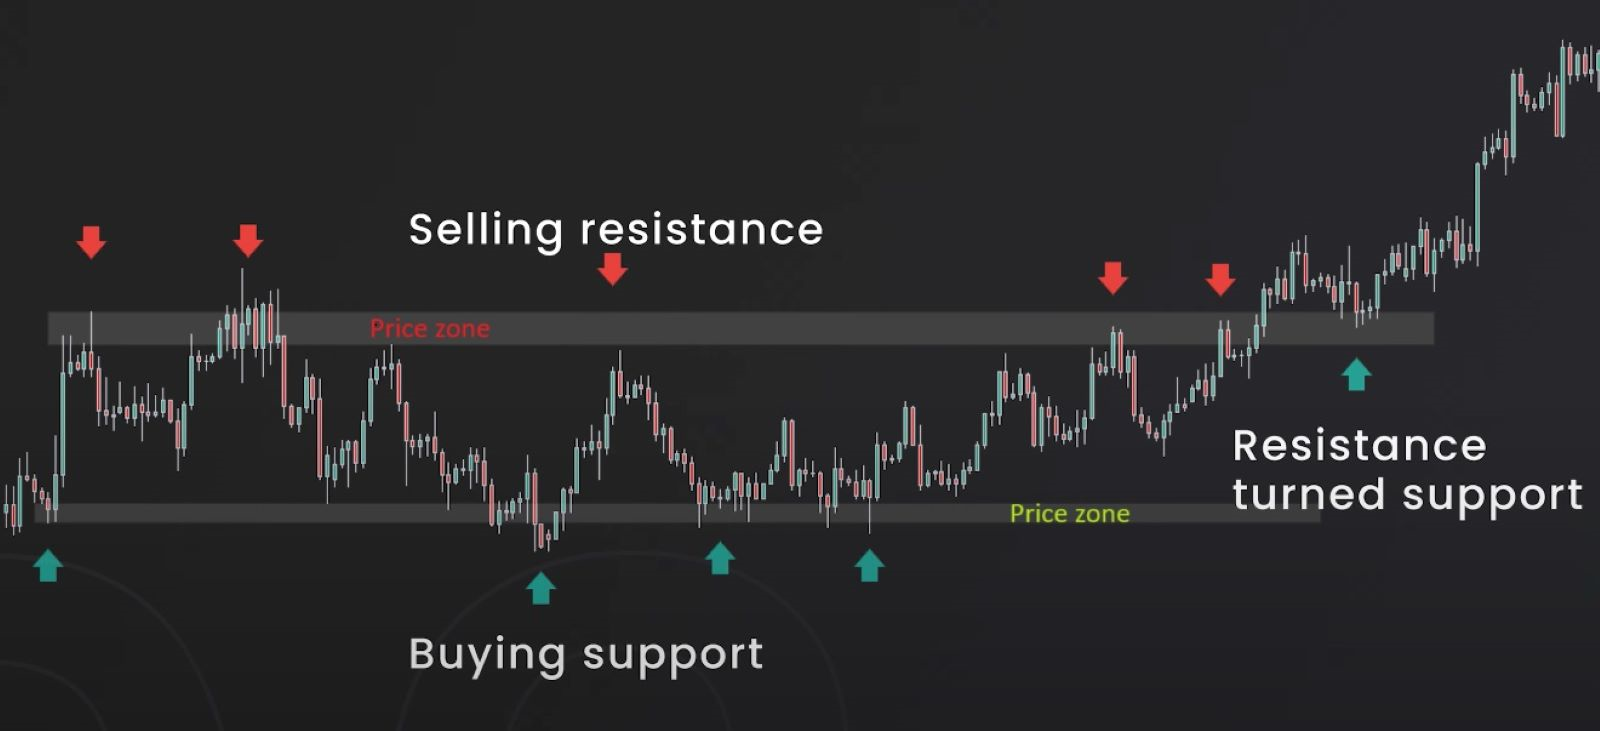
Support can be a single price level on the chart or a price zone. In any event, support is an area on a price chart that shows buyers’ willingness to buy. It is at this level that demand will usually overwhelm supply, causing the price to bounce or reverse its downward movement.
What is Resistance?
Resistance is the exact opposite of the support. Prices move up because there is more demand than supply. As the prices move higher, there will come a point when selling will overwhelm buying, causing the price to reverse its upward movement.
This happens for a variety of reasons. It could be that traders have determined that the prices are too high or have met their targets. It could be the reluctance of buyers to initiate new positions at such rich valuations. But a technician can clearly see on a price chart a level at which supply begins to overwhelm demand. This is resistance. Like support, it can be a level or a zone.
Support and resistance levels are horizontal price levels that typically connect price bar highs to other price bar highs or lows to lows, forming horizontal levels on a price chart. Support and resistance levels form sweet spots on the chart and create zones of trading significance. To identify strong S&R, a horizontal line should be placed in such a way that it connects at least three price action zones, all of which are well-spaced in time, at the price level.
Once a price zone is identified on a chart, an experienced trader can recognize a potential trade opportunity. Identifying a price zone, however, is not enough to trade successfully. A seasoned trader will not accept a trade based solely on the fact that the price reached a significant price zone. They will need several confirmations to decide if and when to take a trade. On the other hand, they will only accept a trade if the price has reached a price zone. Meaning that the confirmation of a price zone is the first step to create a trading strategy.
There can be many support and resistance areas on the chart. This can make it difficult to find the correct point. By adding indicators such as moving averages, Fibonacci retracement levels, pivot points, or trendlines, to name a few—one can get more confirmation on using past price action to anticipate future price movement. On the other hand, using too many indicators concurrently can bring confusion and may overload charts, making them look like abstract works of art that are visually stunning, but impossible to interpret.
Another important point to keep in mind is that these levels are theoretical and far from absolute. No indicator, including support and resistance, is 100% accurate. There is always that dark cloud of losing trades hanging around, casting a shadow of uncertainty. So, whatever your trading strategy, you need a thorough knowledge of the markets, discipline, and a robust risk management measures in place to keep your chances alive and stay in the game for the long term.
Stock Volatility
Stocks can behave irrationally. Stock prices are subject to all kinds of emotional response. They fluctuate in value constantly—some more so than others. The more a stock’s price fluctuates, the more volatile it is. For any particular stock, price fluctuation occurs between support and resistance levels like a ball bouncing between two glass walls. A stock’s support and resistance levels can change if a stock breaks out of its support/resistance strait.
The Quest for “Breakouts”
Monitoring the breakout is considered the most effective to apply support and resistance. A breakout is when an asset class falls below or above support. It gets interesting as the two can swap roles that is, when support breaks, it becomes resistance, and when resistance breaks, it becomes support. But beware of false breakouts! They occur when prices briefly break through the trend line before returning, potentially leading traders to make incorrect decisions.
Breakouts are typically characterized by higher-than-usual trading volume and may be triggered by the emergence of a piece of information that traders feel is relevant to a stock’s value.
A price breakout is the most important event on the chart for any trader. Breakouts mark the transition from a directionless and choppy market to a strong trending market, like sailing from rough seas amidst strong winds to calm waters, however briefly. The trend that emerges after a breakout can be very powerful and very profitable to trade.
How Do Traders Use Support and Resistance Levels to Make a Decision?
It is a truism—but nonetheless compelling—that no two traders are the same. The process of interpreting price action is highly subjective. It is very common for two traders to reach completely different conclusions while analyzing the same price action.
Every investor has their preferred trading style. A long-term value investor (a strong silent type) who has identified a stock they believe is undervalued might look at that stock’s one-year support level and wait to buy until the stock nears that level so as to maximize their eventual gains. A bearish trader (a pessimist about the markets who expects prices to decline in the near- to medium-term) might wait until that stock approaches resistance before shorting it or buying a put option (akin to shorting a stock) on it. A day trader or swing investor (carpe diem) might draw very short-term (e.g., one week or even one day, and potentially multiple times per day) support and resistance lines and buy and sell a stock accordingly, multiple times, as it approaches these limits.
That being said, any sort of investor might benefit from timing their buy and sell decisions based on a stock’s proximity to a support or resistance line.
Closing thoughts
Trading support and resistance levels are no secret or magic and yet it is one of the most neglected trading concepts, and many traders fail to apply it properly despite how effective it is.
Regardless of your trading style, support and resistance are fundamental concepts to understand when it comes to technical analysis. Support acts as a floor for price, while resistance acts as a ceiling.
Different forms of support and resistance can exist, and some are based on the interaction of price with technical indicators. The most reliable support and resistance areas tend to be the ones that are confirmed by multiple strategies.